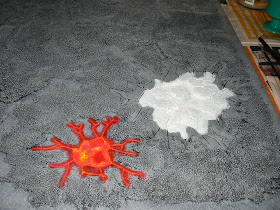
Well, finally time to bite the bullet and try for some lava effects. Two of the boards had big skull pits on them, so they're going to be my lava pits.
Firstly I had to put a base-coat over the black because the yellow paint would take a bazillion layers to show over it. Fortunately I just happened to have some Iyanden Darksun foundation paint, so I slathered that on fairly thickly.
After that it was another full coat of Golden Yellow, then a fairly heavy brushing of red, this crater is relatively small, so I wanted it to be "cool" compared to the larger crater, and that meant more red than yellow.
You can also see that I've begun preparing the larger ex-skull pit with Astronomican Grey foundation with a Skull White drybrush. Two reasons for that, one: I wanted to try a different technique to see which I liked best, two: I wanted this pit to be hotter, more yellowy, so wanted a lighter undercoat.
Next step is some Scorched Brown for the cooler rocks and stuff.
After that there are some touches of Chaos Black and neatening the edges, which were thoroughly messed up by the drybrushing. Also, the bubble in the middle was repainted Golden Yellow.
The whole surface of the lava, not the cracks or rocks, was then given a gloss coat to make it look shiny and stuff. I'm not sure what will happen when I later give the whole thing a matt varnish spray, but I guess I can re-apply.
This was a shot taken without the flash, so it's a little darker than actuality. Here's a shot taken WITH the flash, which makes it all much brighter than it really is. One day I'm going to buy a proper camera.
You can see that there is more of the yellow in the larger crater, and that the edges are a bit blacker rather than the more aged grey of the smaller, cooler crater. The reality of the board is obviously somewhere between those two images.
Technique wise, I ended up using the sponge again for the larger crater, I just can't seem to do a good job with a brush on a large area.
Here's a happy looking Warg for size comparison (flash on).
Well, now it's onto the final board, two more lava pits to go!
I also want to give credit for the technique. If my lava doesn't look good, it's not their fault, it's my poor application!
Lonewolf: http://www.bolterandchainsword.com/index.php?autocom=ineo&showarticle=302
Durinsbane: http://www.one-ring.co.uk/phpBB2/kb.php?mode=article&k=86
Also The Last Alliance on their old website, this link is to the current one: http://www.terrainguild.com/thelastalliance/index.php
If you're a player or fan of the Lord of the Rings SBG or War of the Rings I strongly recommend to you The Last Alliance group. Very, VERY helpful people and a great source of both information and entertainment.
Well, next post should be the last board with lava! After that it'll be me umming and aaahing over whether I'm done enough to give them the final matt varnish spray or not. Part of me wants to keep working at it, the other part wants to get on with playing games on it!


That big lava crater looks amazing! After you matte coat the board, I'd definintely put gloss back on the lava fire. Maybe not on the blackened rock parts, but certainly the fiery parts.
ReplyDeleteI agree, looks great!
ReplyDeleteI really like what you guys tend to be up too. This type of clever work
ReplyDeleteand exposure! Keep up the very good works guys I've added you guys to blogroll.
Here is my blog post video promotion
Feel free to surf my site - video promotion