Here are my Hobbit Militia.
Two guys with axes, one blacksmith and one of the guys I showed you in a previous post that seems angry that his drinking time has been interrupted!
These ones do have names, Robson (Rob), Marmadoc (M.C.), Flambard, and Wilcom (Jolly).
I just wanted to straight out call the blacksmith M.C. Hammer, but my wife and son decided it had to be at least a little more "hobbity". I'll show you Jolly Wilcom's drinking buddy maybe tomorrow.
Sunday, March 10, 2019
Saturday, March 9, 2019
Farmer Maddock (Farmer Maggot)
One of the leaders of our Battle Company is Farmer Maddock.
Obviously I've used the Farmer Maggot model for this one!
We haven't named the dogs yet (but I'll definitely be getting some once I've earned some influence!)
I went with fairly drab colours here, painting him before I thought he might be one of the leaders. As a result, if I do get another model I'll do something a bit more interesting!
I was pretty pleased with how the dogs came out too, they're so tiny!
Friday, March 8, 2019
Hobbit Shirrifs
Next up, the Shirrifs!
Brandishing their big wooden branches, they look ready for action!
And afterwards, a trip to the pub.
Wednesday, March 6, 2019
Hobbits on the way!
It's my birthday coming up and I want to play a new Battle Company with my brother and some adjusted rules. So I have to get cracking on my hobbit painting!
Here's the first four - the archers
I began by spray painting them all white (I usually do black, but I wanted brighter colours).
We (my son and I) decided to make a couple of the hobbits a little different. I had an old Sam and Frodo at Mount Doom. They look very disheveled so we decided that maybe they were just a little under the weather from all their drinking. These two hobbits have been nicknamed the "Cheers" hobbits.
The Lobelia model is going to be our leader - Raging Rose of Rose's Ragers (or something).
I used some filler to go over all the bases.
Now they've had a wash...
Up the back you can see a couple of other miniatures. We saw them at the shop and thought, why not! A couple of rangers or something.
And from here on I'm just finishing them off. The four archers show the technique. Once they're base coated and washed it's just a matter of doing the highlights and putting some grass on the bases. I've not based using anything other than grey sand before, so this was kinda fun!
Sunday, March 3, 2019
Shire Houses
The spare Hirst Arts blocks that I used for the hobbit hole were actually so that I could build some houses, but the hobbit hole was so much fun that I did that first!
I had enough blocks created to make the Dragon Inn, but thought I'd actually just make a few houses instead. I'll maybe do the bigger building next time =)
So I have three houses, one small, one medium, one large - there are probably three bears or something involved.
When I first got the blocks I started just by rearranging them in different ways to see what they looked like.
Then, after a lot of mucking around (and you can see in the background that I was watching the LotR DVDs while doing so) I glued it all together. The angled pieces were my main limiting factor, so I decided I needed one house that used both sorts and had an asymmetrical roof.
I watched a lot of youtube clips on how to do roofing and went for the cheapest option I had - cardboard. If you look up cardboard shingle roof you'll see many versions. Here's a picture of when I realised I hadn't cut the little notches in this side of the roof even after I'd glued it. That was fun. Not!
I also managed to really warp one of the roofs as I let it dry before gluing it onto the building. D'oh! Anyway, it's all good now, I just heavily glued the back side of it then sat and watched more LotR while holding it in place until the glue set.
The small house has one door and window, the medium has one door and two windows and the large one has two doors and two windows. I used the same paint scheme as for the hobbit hole.
So there you have it, some more scenery! With my birthday coming up I'm hoping to get a green grass mat to put it all on!
I had enough blocks created to make the Dragon Inn, but thought I'd actually just make a few houses instead. I'll maybe do the bigger building next time =)
So I have three houses, one small, one medium, one large - there are probably three bears or something involved.
When I first got the blocks I started just by rearranging them in different ways to see what they looked like.
I watched a lot of youtube clips on how to do roofing and went for the cheapest option I had - cardboard. If you look up cardboard shingle roof you'll see many versions. Here's a picture of when I realised I hadn't cut the little notches in this side of the roof even after I'd glued it. That was fun. Not!
I also managed to really warp one of the roofs as I let it dry before gluing it onto the building. D'oh! Anyway, it's all good now, I just heavily glued the back side of it then sat and watched more LotR while holding it in place until the glue set.
The small house has one door and window, the medium has one door and two windows and the large one has two doors and two windows. I used the same paint scheme as for the hobbit hole.
So there you have it, some more scenery! With my birthday coming up I'm hoping to get a green grass mat to put it all on!
Tuesday, February 19, 2019
The Shire
It's been a while!
From above you can see that I've sort of put it in tiers so that it can be climbed up (sort of) in hindsight I probably should have smoothed it right down, but it's awkward working with this polystyrene. I've seen people use the nicer sort but I don't have any of that.
I used a bit of green stuff on a round plastic base and used a ruler to score "planks" and a piece of wood from the garden to imprint it with wood grain.
I had some Hirst Arts blocks left over from other stuff that worked nicely for round doors and windows. I used poly filler to stick it down on some cardboard cut to fit the flat sides of the hill.
So you can see it sort of standing up here.
Next I used some roofing gap filler to squirt all over the whole thing and then used a rolled and scrunched up piece of alumnium foil to texture it.
You can see the tiled bit stuck on here, I put a few bits of balsa around some of the features both for a bit of colour and texture but also to help glue on the roofing tile bits!
And here's the other side. Oh, you can see I also used some of the filler on the cardboard walls to give them a bit of texture as I sort of wanted a stucco look.
With some cheap craft glue from Bunnings I slopped brown all over the dirt and wood.
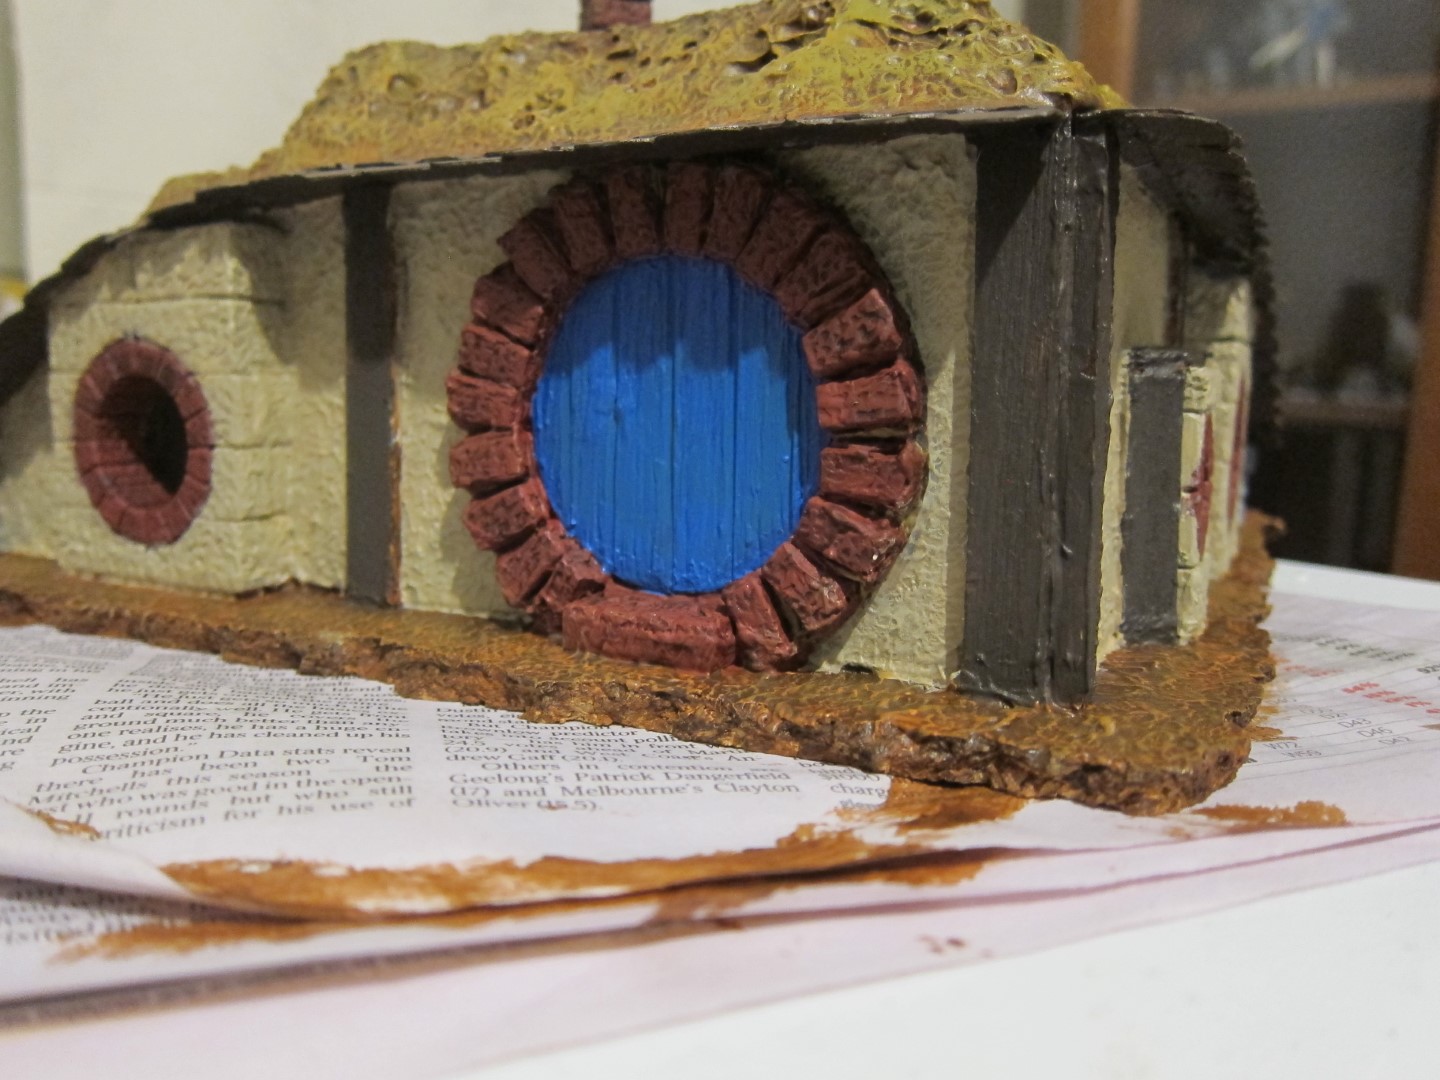
Next I used a sort of reddish brown on the bricks and Karak Stone on the walls.
I tried a bit of drybrushing on the dirt, but it was a horrible yellowy colour when it dried! Ewww! I also used some Dryad Bark on the wood and tiles.
We decided on a bright blue door. The bricks were washed with Agrax Earthshade then re-drybrushed with some of my old Scab Red paint. The stucco was drybrushed with Ushabti Bone and a little Tyrant Skull. The wood got a bit of Baneblade Brown.
I splashed out at got a canister of flocking! As you all know I've only ever done grey and black rock and gravel before, so this was all very new to me!
My brother 3-D printed a lamp-post for me! I also used a pin with a round head to use as a door handle and made a knocker our of a small round link from a jewellry kit. Oh, and at the op-shop I saw an old basket that I cut up to use as fences.
It's looking nice and green now!
For some extra decorations I thought I'd try and make some little flower boxes. It's a little block of balsa wood with tiny nails hammered into it.
Paint the top of the nails in colours and the rest brown with a bit of the flocking and voila - flower box!
And when you put it all together you have a hobbit hole!
I'm really pleased with how it came up and for my birthday I've requested a green table mat so that the hobbit hole doesn't have to sit in the ash wastes of mordor or in the underground mines of moria!
Christmas has come and gone, as have the holidays! Over the holiday season I got up to a few projects and today one of them is finally finished!
It's taken me ages to do, but mostly because of time restrictions, I'm sure some of you out there could knock this up pretty quickly!
Over the Christmas period I received the following...
My son really likes the idea of hobbits, so we went all in on enough for a battle company of hobbits!
Of course, they'll need painting and somewhere to live so we are working on some dwellings and what better place to start than an actual hobbit hole =)
I started with some cheap packing styrofoam and put it on an old cork tile.
From above you can see that I've sort of put it in tiers so that it can be climbed up (sort of) in hindsight I probably should have smoothed it right down, but it's awkward working with this polystyrene. I've seen people use the nicer sort but I don't have any of that.
I used a bit of green stuff on a round plastic base and used a ruler to score "planks" and a piece of wood from the garden to imprint it with wood grain.
I had some Hirst Arts blocks left over from other stuff that worked nicely for round doors and windows. I used poly filler to stick it down on some cardboard cut to fit the flat sides of the hill.
So you can see it sort of standing up here.
On youtube I saw people making roofs out of cardboard strips cut out, so I thought I'd give that a go for my other Hirst Arts project (more on that later) and to provide a sort of overhang on the hill.
Next I used some roofing gap filler to squirt all over the whole thing and then used a rolled and scrunched up piece of alumnium foil to texture it.
You can see the tiled bit stuck on here, I put a few bits of balsa around some of the features both for a bit of colour and texture but also to help glue on the roofing tile bits!
And here's the other side. Oh, you can see I also used some of the filler on the cardboard walls to give them a bit of texture as I sort of wanted a stucco look.
With some cheap craft glue from Bunnings I slopped brown all over the dirt and wood.
Next I used a sort of reddish brown on the bricks and Karak Stone on the walls.
I tried a bit of drybrushing on the dirt, but it was a horrible yellowy colour when it dried! Ewww! I also used some Dryad Bark on the wood and tiles.
We decided on a bright blue door. The bricks were washed with Agrax Earthshade then re-drybrushed with some of my old Scab Red paint. The stucco was drybrushed with Ushabti Bone and a little Tyrant Skull. The wood got a bit of Baneblade Brown.
My brother 3-D printed a lamp-post for me! I also used a pin with a round head to use as a door handle and made a knocker our of a small round link from a jewellry kit. Oh, and at the op-shop I saw an old basket that I cut up to use as fences.
It's looking nice and green now!
For some extra decorations I thought I'd try and make some little flower boxes. It's a little block of balsa wood with tiny nails hammered into it.
Paint the top of the nails in colours and the rest brown with a bit of the flocking and voila - flower box!
And when you put it all together you have a hobbit hole!
I'm really pleased with how it came up and for my birthday I've requested a green table mat so that the hobbit hole doesn't have to sit in the ash wastes of mordor or in the underground mines of moria!
I'll try to share how my other houses are going and, of course, the hobbits themselves, over the next while =)

Tuesday, November 27, 2018
Saruman
This post is about painting Saruman.
It was such a lot smaller model than the dragon!
For those of you who don't want the step by step, here are the three wizards: Gandalf the Grey, Radagast the Brown and Saruman the White.
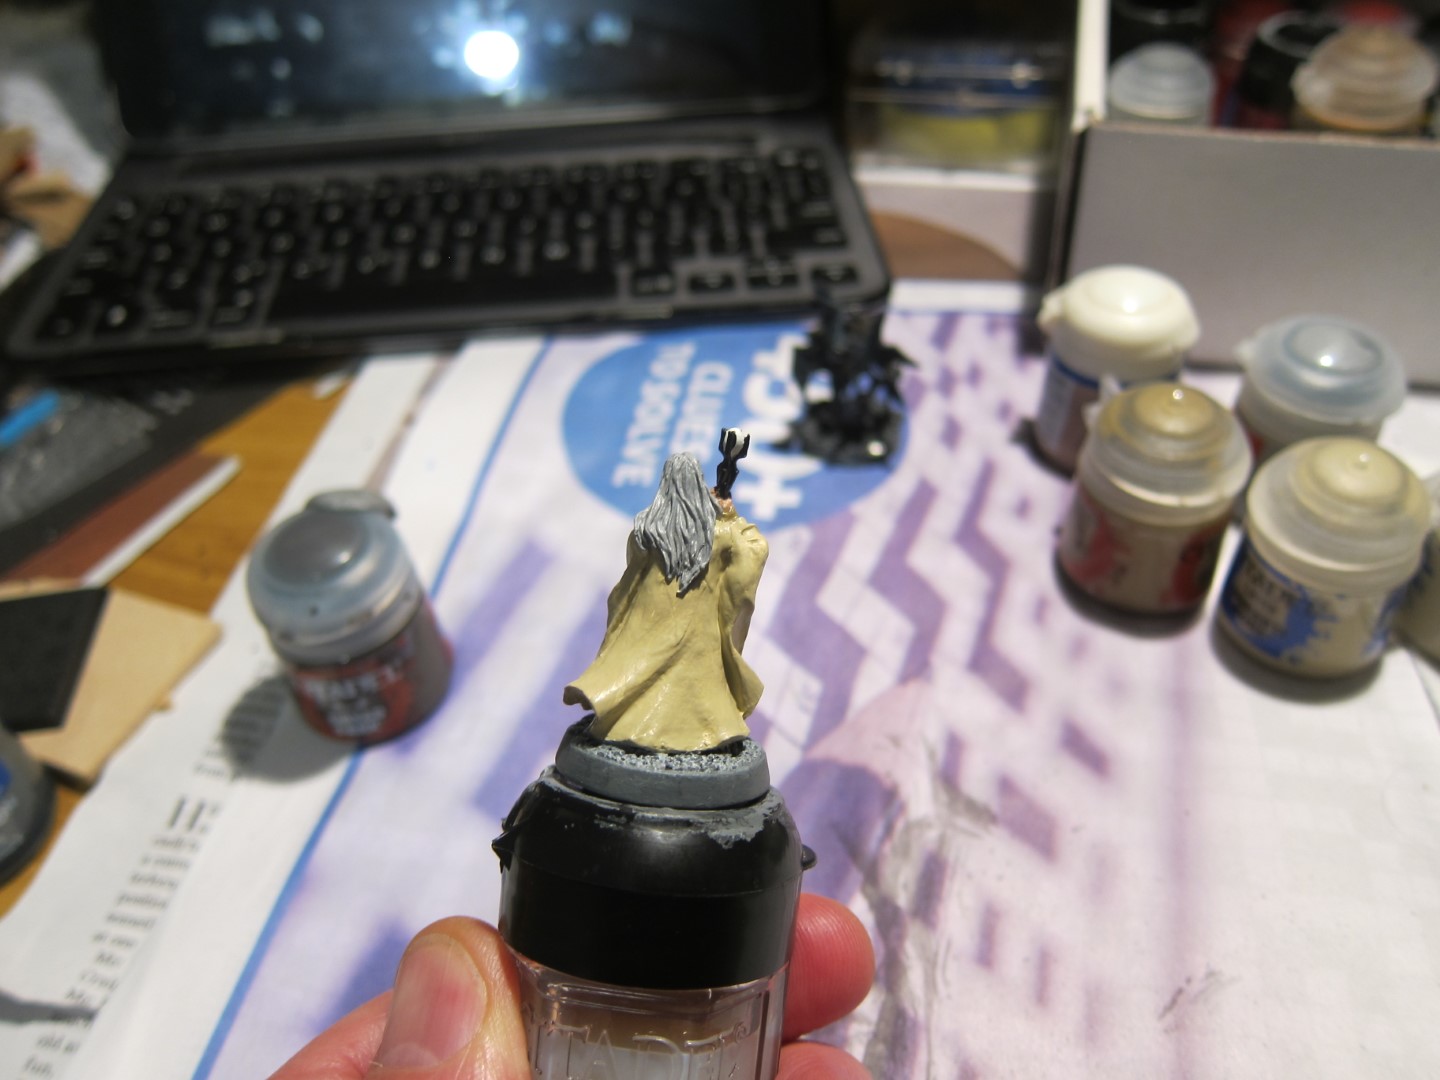
I started with Zandri Dust on all the under-robe areas, Ushabti Bone on all the rest of the robes. The hair was grey, staff was black and white on the top.
From the back you can see it's just a lot of Usahbti Bone!
I highlighted the Ushabti to Screaming Skull fairly broadly along the ridges and then a bit of Ceramite White just on the very edges. I also used the white on the hair. I made sure I did the eyebrows and moustache as well as the beard after painting skin colour on the skin.
You might be able to see the bone/white colours better on the back.
Next I did an overall wash in Seraphim Sepia for the robes and Nuln Oil on the hair.
The reason I went with the bone rather than grey white is because I didn't want him to just look like a lighter Gandalf. Having said that, at this stage I thought I'd pretty much mucked it all up as it looked way too yellow.
However, all was not lost! I got out my Tyrant Skull drybrush and went fairly strongly over all the exterior sections (including the hair!). I did it in two or three lighter layers until I was happy with the tone, then went along the very edges with Ceramite White paint. The skin had some Elf Flesh (I don't know what that's called now).
So it's still got a bit of a yellowy/sepia/bone colour to it, but is still quite light. It's particularly bright when it's on the game-board, as you can see from the first photo.
So now I've got the three wizards, I'm unlikely to play with them, but it's still fun to have them =)
It was such a lot smaller model than the dragon!
For those of you who don't want the step by step, here are the three wizards: Gandalf the Grey, Radagast the Brown and Saruman the White.
I started with Zandri Dust on all the under-robe areas, Ushabti Bone on all the rest of the robes. The hair was grey, staff was black and white on the top.
From the back you can see it's just a lot of Usahbti Bone!
I highlighted the Ushabti to Screaming Skull fairly broadly along the ridges and then a bit of Ceramite White just on the very edges. I also used the white on the hair. I made sure I did the eyebrows and moustache as well as the beard after painting skin colour on the skin.
You might be able to see the bone/white colours better on the back.
Next I did an overall wash in Seraphim Sepia for the robes and Nuln Oil on the hair.
The reason I went with the bone rather than grey white is because I didn't want him to just look like a lighter Gandalf. Having said that, at this stage I thought I'd pretty much mucked it all up as it looked way too yellow.
However, all was not lost! I got out my Tyrant Skull drybrush and went fairly strongly over all the exterior sections (including the hair!). I did it in two or three lighter layers until I was happy with the tone, then went along the very edges with Ceramite White paint. The skin had some Elf Flesh (I don't know what that's called now).
So it's still got a bit of a yellowy/sepia/bone colour to it, but is still quite light. It's particularly bright when it's on the game-board, as you can see from the first photo.
So now I've got the three wizards, I'm unlikely to play with them, but it's still fun to have them =)
Subscribe to:
Posts (Atom)