Friday, October 26, 2018

Battle Companies Battle Report - Hold the Line

This week we were back to The Falcon’s Honour, who were trying to break through a narrow mountain pass held by Etako’s Expeditionaries. We each had one normal troop sitting out so had the same points.

The objective is for the attacker to get a third of their army from one end of the board to the other. The defender has to stop them!

We rolled to see... and the Harad force got to be attackers! Uh-oh, dwarves are a bit slow. But if I could engage them my combat skills might help, and I have three archers now!


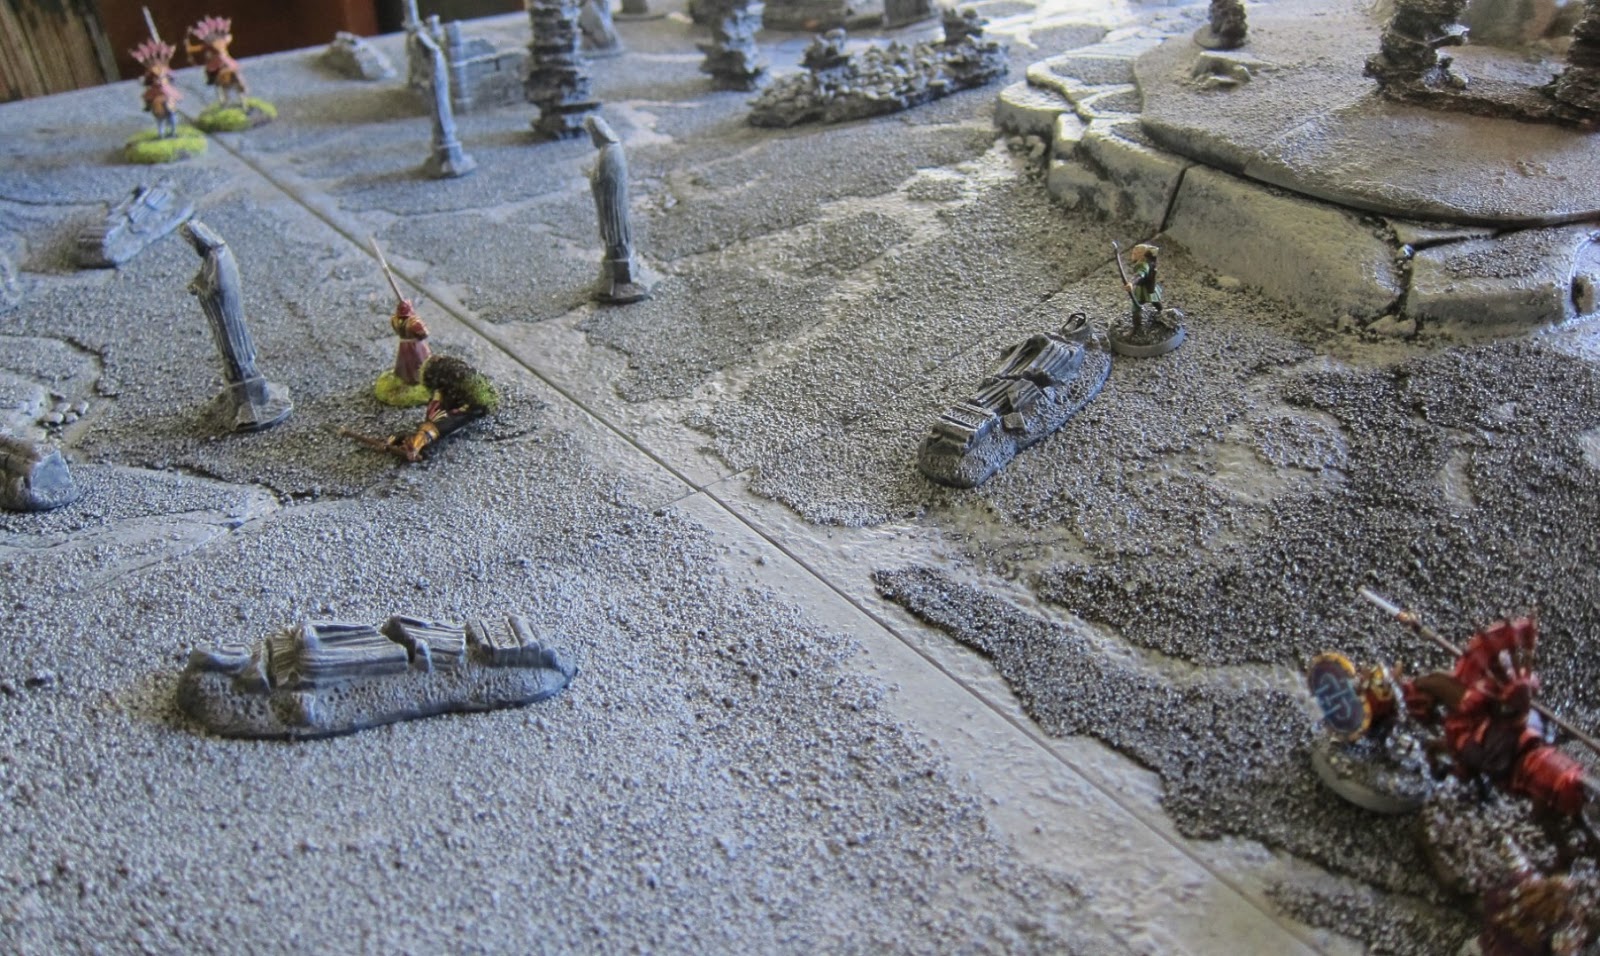
We started off quite close to one another, with the dwarves deploying in the center. Arrows and throwing axes all missed until we were quite close to one another in turn 3 when Archie finally got an arrow into The Fox. Etako’s force were concentrating all fire on the horses, knowing that they held the best chance of escaping.


In turn four the dwarves get priority and go to charge at the horses within reach, but The Falcon calls a heroic move! Etako’s also calls one... the die is cast... Etako wins out! The dwarves charge as many horsemen as they can.

As arrows and axes fly, The Fang takes out Archie while Loki perforates the Watcher of Karna!


Coming down the hill, Boggle throws an axe, takes out The Hawk's horse, then he and Diva send the Haradrim out of the fight too. The Falcon is surrounded by Etako, Skodi and Rocky and Skodi hits the man on the horse, but fate is with the human and no damage is done! Freya, the Iron Guard launches an assault at The Pincer and only a lucky fate roll saves him from her flashing blades!


In round 5 the Haradrim take priority! Some begin running (or galloping) away from the dwarves towards the far end of the mountain pass.

Thanks to his special archery skills, The Fang gallops along AND looses a shot that takes out Loki! Rhoda (the elf) misses yet again!


The Falcon shows why he's in charge of an elite battle company as he uses all his skills (including deadly poison) to knock down four dwarves and remove both Rocky and Skodi from the mission!


In round six, priority was key, as the Harad force really needed to break away further. Dwarves won priority! The Falcon uses his second point of might to call another heroic move, this time Boggle counters it... the die rolls... the dwarves win again! 

Rhoda finally finds her elven archery skills and shoots The Sparrow in the back!


Kara Longspear skewers The Wolf over Hilda Trollslayer's shield.


 Meanwhile Freya takes out The Wolf. Boggle dodges the horse hooves and gets a strike in on The Falcon, who has managed to tie up quite a number of dwarves!


In round 7 the Haradrim get the priority, but nothing can save The Falcon who is completely surrounded and falls to Diva after sacrificing himself for the rest of his team.


And the rest of the game plays out as a bizarre chase scene as Brynmor chases after Black Cloak across a board and a half! Finally he manages to both catch up AND wound the Harad archer. All the other Harad force have made it to the board's edge... but did they get four there?


Yes! Each of them gains a bonus point of xp! Yet another Harad victory! We think next time we might play the same mission, but with the opposite roles, just to see if the dwarves can walk that far!


So at the end of the game The Falcon's Honour rolled on the various tables and...
The Falcon gained Terror.
The Talon gained an extra point of might.
The Fang increased his shooting to 3+
The Pincer rolled a 12 on his injury chart, gaining a point of fate and also gained Expert Shot.
The watcher of Karna will miss the next game due to injury.

And here's a photo of the current dwarven battle company. From left to right we have Loki Lightfingers, Mighty Monty, Rocky, Archie Longsight, Brynmor Deepminer, Freya, Etako Ironfist, Skodi Strongarm, Rhoda, Boggle Bootmire, Mighty Monty, Kara Longspear and Hilda Trollslayer.


Etako's Expeditionaries...
Etako gained the special rule for Dwarves (which is useless!)
Brynmor gained an extra point of might.
Boggle gained Parry.
Skodi will miss the next game due to injury but has been promoted to Iron Guard.
Hilda Trollslayer gained an extra attack!

Thursday, October 18, 2018

Bloodfang's Pack Battle Company Battle Report - Narrative 1

Remember the Wild Warg Battle Company idea?
Well today we tried it out.
Using the prison break narrative mission, Bloodfang and his pack leapt into action.
The wargs in the pack are:
Bloodfang (Lt.) (Wild Warg Chieftain)
Snowmane (Sgt.) (Big White Fell Warg)
Blackbeard (Sgt.) (Big Black Fell Warg)
Biter (Gray, closed mouth)
Longfang (Gray, open mouth)
Ripper (Brown, closed mouth)
Chomper (Brown, open mouth)


The pack are all here - except for Longfang
, who is locked in a tower!


For the first few rounds the wargs rapidly move across the battlefield, waiting for a chance to... pounce! Snowmane, Ripper and Chomper take down a goblin archer extremely quickly.


Bloodfang leads Blackbeard and Biter to take down another goblin, ensuring that the alarm is yet to be raised.


Round 5: The wargs leap forth again! This time, however, the goblin beats Blackbeard and wounds him - but a lucky fate saves him from going down. Bloodfang has to use might to win his fight, but fails to wound... the alarm is raised!!


Round 6 - the goblins get priority! Charging into battles where possible and shooting black tipped arrows into the wargs...


The goblin archers hit... another goblin... and kill it! Oops!


Turn 7 - the goblins win priority again! Charging towards the wargs, the wargs counter attack. Arrows fly, but miss. Blackbeard, who dodged around combat to attack a spear-goblin, takes him out.


But Bloodfang loses his combat and is wounded! His fate can't help him and down he goes! Not the best start to a mission, let alone a battle company career!


Meanwhile, Snowmane has headed around the back, hoping to free Longfang as every furry body helps!


Round 8: Snowmane charges up the stairs and takes out the guard! Just one door to bust down and an extra warg can enter the fray!


In the other combats blows are traded back and forth, but no damage is done.


Round 9 - priority goes to the goblins, who charge into action, being countered by the nimble and speedy wargs! Chomper smashes his opponent. Biter and Ripper destroy their opponent as well.


Snowmane continues scratching at the door, but cannot penetrate the thick oak!


 Blackbeard loses his fight, but is unharmed.


Round 10 and the wargs win priority, charging out to try and remove some of the archers... who shoot down at the slavering wargs and remove Chomper from action! 


In round 11 the goblins win priority, the last remaining speargoblin runs towards cover with the archers, but is pounced upon and Blackbeard takes him out. Arrows fly but fail to penetrate any warg fur. The door remains firmly shut!


In round 12 the archers continue to miss, but Ripper manages to take out one of the archers!


Making some difficult terrain climbs takes a round or two, but eventually the wargs climb up to attach an archer. The archers continue to miss their shots!


And Snowmane continues to scratch ineffectually at the door!


After three rounds of combat with the goblin archer winning against two wargs, they finally get a blow in and Biter removes another archer from combat.


And several turns later Snowmane finally opens the door and a little later pounces up and takes out the last remaining goblin.


Post game: wow, those wargs are fast! Also, strength 4 is awesome, but the goblins were pretty unlucky to only take out two of them as they only have defence 4.

No injuries come in the first mission and the reward is a roll on the reinforcement table. A new Fell Warg joins the Battle Company!

With the experience gained, Snowmane gains the Leaping Charge special rule (allowing him to act like cavalry). Blackbeard gains an extra point of might. With the influence gained the wargs gain Poison Fangs and Claws. 

I'm not sure how far these wargs will go, the lack of upgradability is going to hurt in the long run, but boy it's fun how fast they move after playing dwarves for so long!

Friday, October 12, 2018

Troll Hunt! Battle Company Battle Report.

After both our battle companies escaped from the Mirkwood Spiders we found ourselves wandering near a volcanic area in the Misty Mountains. Both teams spotted a treasure chest in among some ruins, but there was a cave troll there too.

We played a mix of two missions, firstly to kill the cave troll, the person striking the final blow against it would become a hero in the making if they were a normal warrior or get a free roll on a skill chart if they were already a hero, so there was quite an incentive to attack the monster!

The troll follows very simple rules, if it is in charging distance of anyone it will attack them, otherwise the person who does not have priority gets to move them. We also ruled that for power attacks it will use them according to what is likely to do the most damage.

The secondary mission was to reduce the enemy team to 25% of its starting numbers.

Below you can see the set up.

I should also mentioned that we amended the rules slightly so that anybody with a wound can elect to miss a match and afterwards roll on the injury chart with a +/- 1 to the roll and ignoring any bad effects. To that end The Serpent and The Falcon sat out this game from the Harad side, as did Rocky and Boggle.


The hulking brute...


The first thing we did was all shoot at the troll while it moved towards the dwarves, both sides scored one hit. Rhoda, the elf, shot and wounded it, then The Fang used a point of might to also wound the troll.


The Pincer managed to shoot very long distance and with lethal aim and a poisoned elf bow he brought down Diva!


Next round my dwarves all passed their courage tests and charged the troll to surround it. The troll rolls... nothing bigger than 5s! All I have to do is get a 6 on my 7 dice! And I did! Hilda Greatshield struck the killing blow, rolling another 6! Bye bye cave troll!


In the meantime, ignoring the troll, The Fang kills Monty! From riding horseback! Thanks to his steady aim special rule he's mobile and deadly!


Here's a shot from above at the end of this round, the Haradrim are sticking together and taking out my dwarves, while they focus on the troll.


The dwarves won priority most of the time, and round 3 saw Hilda charge The Hawk and take him down with help from Kara Longspear.


Meanwhile, up on the hill, The Fox charged at Archie and although it took five dice (thanks to poison rerolls) he brings down the archer!


In round four my final normal shield dwarf, Skodi, is charged by two horses, The Fang strikes the killing blow with a poison war spear!


With the Haradrim getting priority, Loki is charged on the hill by The Fox, who is just mowing through the archers!


In round 5, Kara and Hilda are surrounded, Kara is taken out by The Fang! The Talon uses his Fell Sight to charge Hilda who somehow manages to hold off against five dice!


Meanwhile, the dwarven heroes charge into combat also, Brynmor kills The Sparrow with a throwing axe and he and Etako charge at The Tiger and call a heroic combat. Killing The Tiger allows Etako to then charge into the Watcher along with Freya the Iron Guard. The Watcher whirls and twirls and manages to hold off the dwarves!


It's anybody's game at this point!


Up on the hill at the start of turn 6 The Fox is looking at Rhoda...


Harad get priority and The Fox charges at the elf, taking her down.


The Harad team all back away, as the Dwarven team is now broken and will have to check their courage to stay in the fight! 

In the shooting phase The Pincer takes out Freya thanks to more poison arrows! Etako passed his courage test, but couldn't move fast enough to get into combat and missed with his throwing axe. Hilda, however, battled and stayed in the fight.


Meanwhile, Brynmor has to use a point of will to pass his courage test, which he uses to throw his axe at the Watcher, who had just nabbed the treasure! (2 bonus influence points)


In round 7 the dwarves win priority, here's their chance to use their mighty combat skills and charge into battle to even the score and win the game! 

But first, they have to roll courage tests...

Etako rolls a 3... failing his.

Brynmor rolls a 2... failing his.

Hilda rolls a 10 and stays on for one last round, she manages to fight back against the Harad attackers, but fails to wound any, though they fail to wound her too.


At the end of the game, The Falcon's Honour still had 7 of their warband up, with only one single dwarf remaining - I'd call that a major victory for the Haradrim!

Post game we tallied up the xp etc. 

The Falcon recovered from his old battle wound. The Fang, who was easily the man of the match, rolled and got Master Archer, so he now has Steady Aim, Master of Poisons AND Master Archer! The Tiger will have to miss the next game with an injury.

On the dwarven team, Hilda will from now on be known as Hilda Trollslayer! And Brynmor rolled and got an extra point of might, which should come in handy for next time! Mighty Monty will have to miss the next game with his injury. All things considered, I did VERY well rolling on the injury chart to only have one injury at the end!