Showing posts with label assembly. Show all posts

Sunday, July 3, 2011

Another combi-melta conversion and a scout group.

Well, I had my scout group sitting there and couldn't resist putting it together in the end!


For this group I wanted:


Wolf Guard Pack Leader with combi-melta and Thunder Hammer.


Melta, Mark of the Wulfen, Power Weapon and Plasma Pistol. A fully tooled up and ready to cause havok group. Also I loved the idea of them being really individuals that happen to be working together at this moment rather than a completely uniform group.


So I needed another combi-melta and decided to make it in a different way to the last one.


Here you can see where I cut this time. For this combi-melta conversion I was going to use a storm bolter and a melta gun. I cut the barrel off, the tubing underneath and with my fairly dull hobby knife I slowly pushed and sawed through the side bit as shown in red below.


Then it was a simple matter of filing and cutting down one side of a storm bolter and then adding on the metal bits from the melta.


And here's a top view. I also glued another boltgun tip to the exising storm bolter tip to extend the barrel a little. I think they look cooler that way =)


And here they are with the Wolf Guard. To help him be a scout guard I used a scout torso on him. This didn't perfectly fit with the rest of the power armour, so I had to add a few other bits to hide the join. The front banner will have something freehanded on it when it's painted. 


And the big back shield indicates that he has had other jobs in the past...


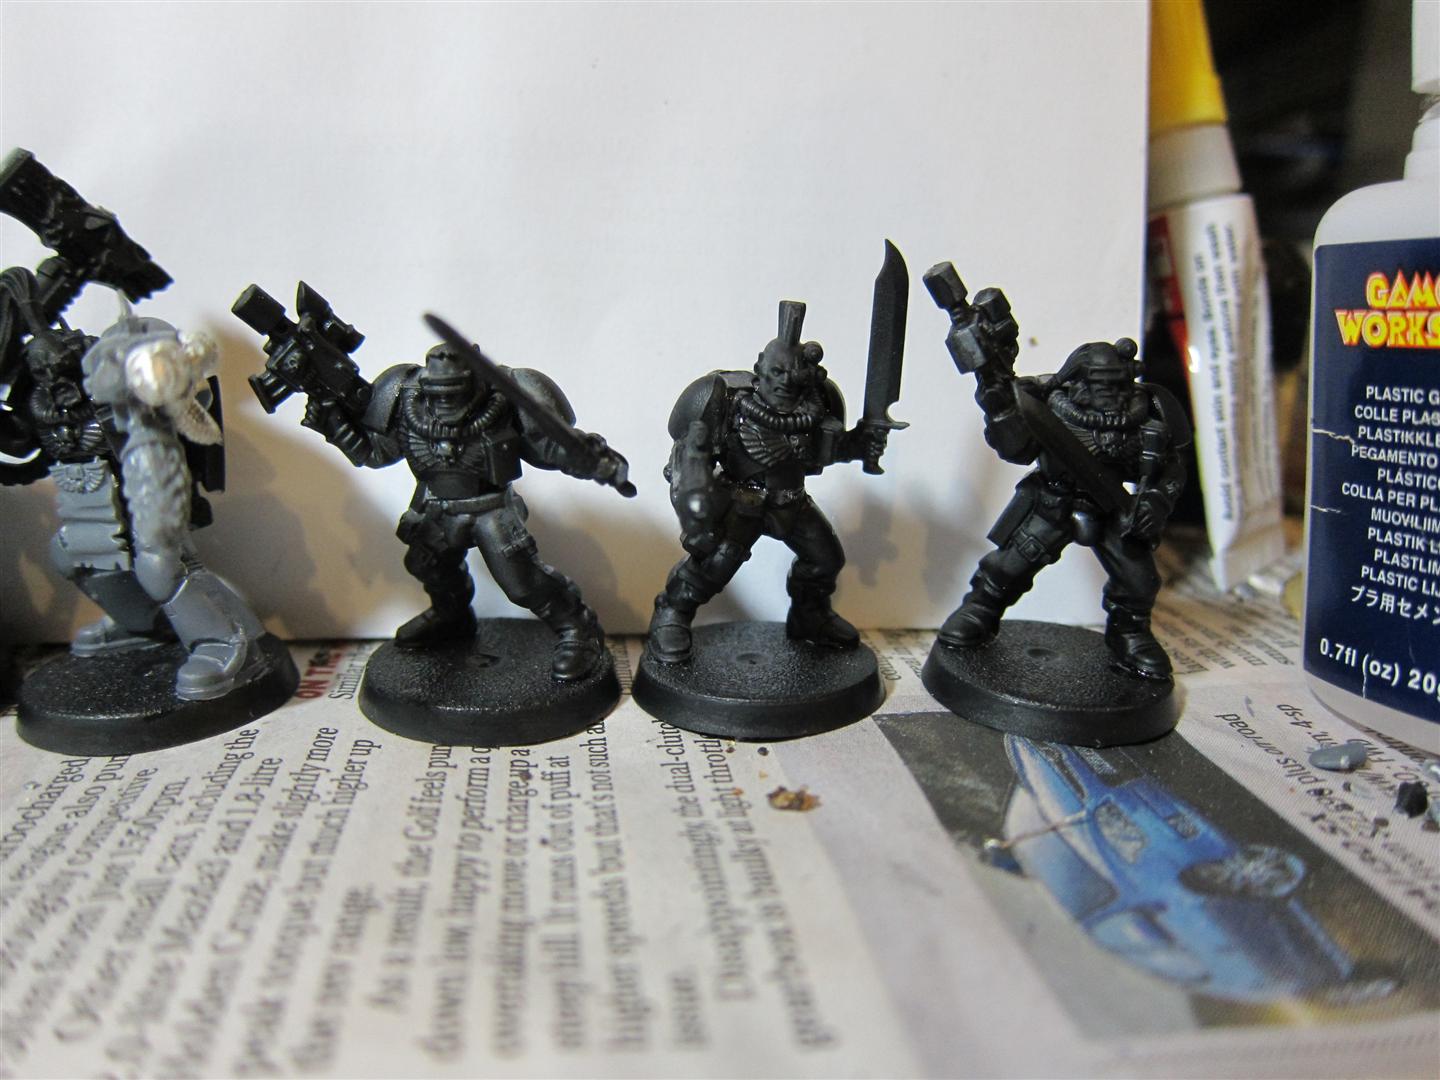
So here are my motley group of scouts. They aren't very "wolfed up" and I'm not sure if I'll accessorise them or not yet (let alone use them in a game). I didn't enjoy putting them together as much, the torsos just didn't really easily fit, nor did the arms. I think the newer kits are much more clever.


Here's melta-boy (with metal under his base to balance the heavy gun), wolfen dude (with power armour torso for the wolf fur on his back and wolf helmet) and the wolf guard you've already seen.


And here we have power sword (hard to tell from this angle, but it's the big sword from the space wolf kit), plasma pistol guy (just cut the plasma pistol from a space wolf and swapped it with the default bolt pistol) and the one I like to call Norm the normal scout (but with a space wolf scout head).


Next time I'll show you the full army pic =)

Sunday, June 19, 2011

Long Fangs Dual Squad

Well I had a few hours, yes, that's right, HOURS off today as my lovely wife took the baby boy out for a while. So I decided to do a bit of mucking around as well as finishing off the two long fangs squads. Also a guy wielding a missile launcher like a baseball bat =) I had to do an Imperial Guard missile launcher conversion of sorts to work with my space wolf long fangs.


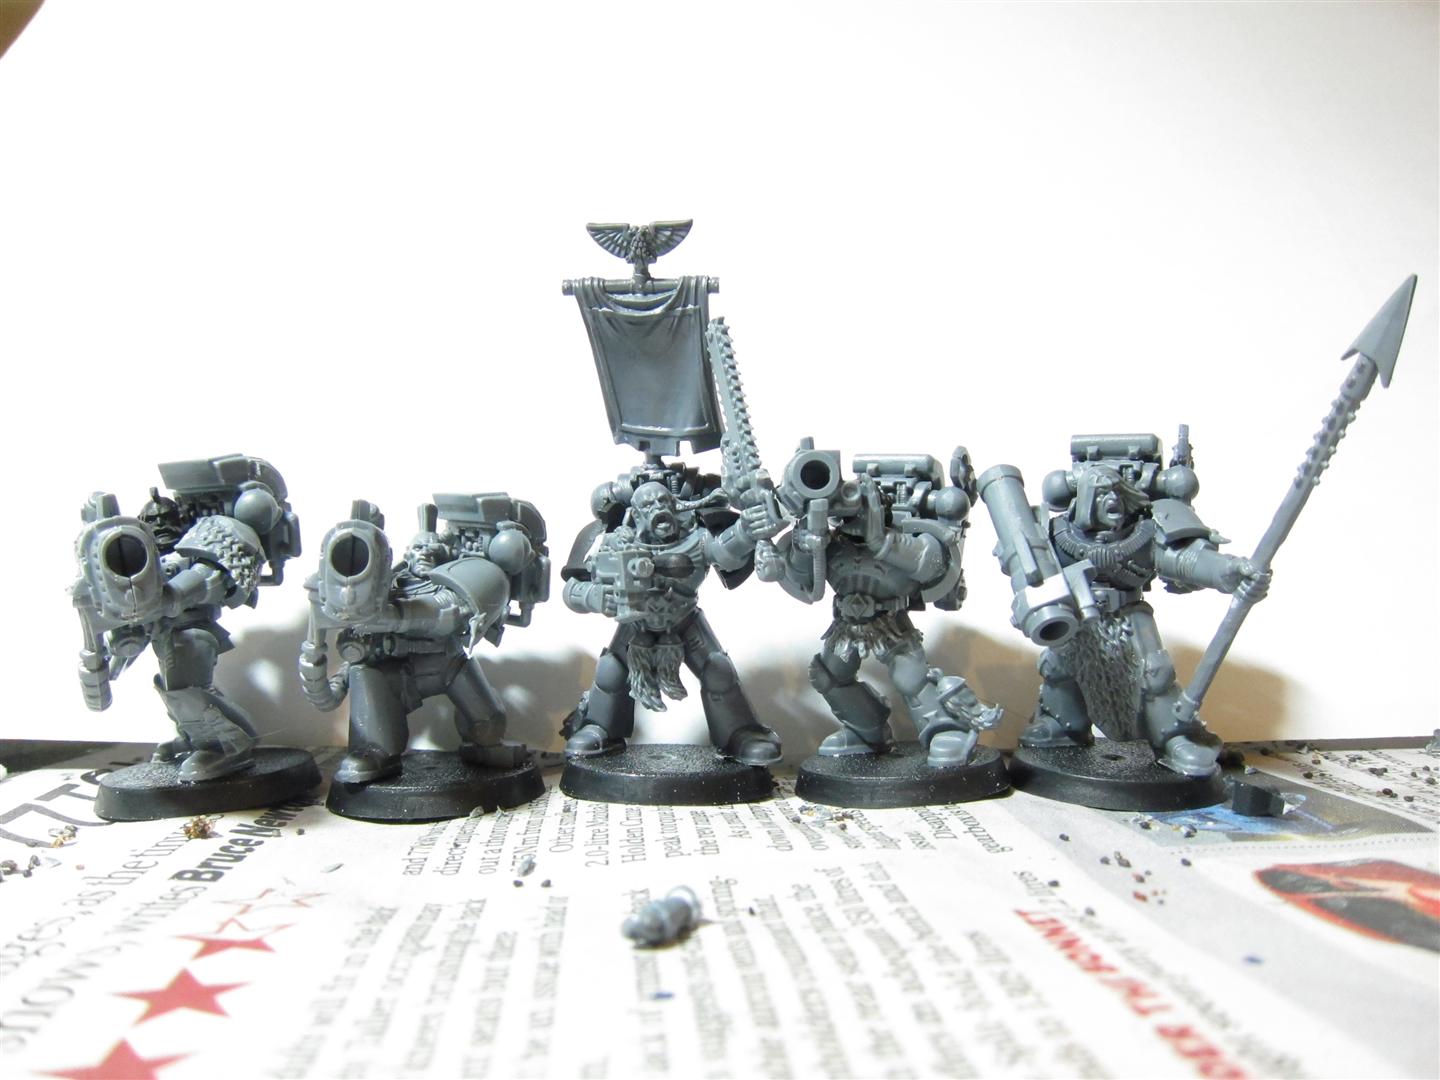
Here are the results. I give you the Wolf's Breath Long Fang squad, dealing massive AoE damage with two plasma cannons and two missile launchers. The templates will hammer all enemies! To make sure they looked like space wolves and not just devastators I've used bits from a normal space wolf box and a spear from some really old fantasy, I think skeletons. They also all have bare heads for a more wolfy feel.


And here's the Fang of the Wolf, heavy hitting piercing damage through two lascannons and two missile launchers. Here's where I had a bit of fun. Given that I didn't have enough space marine missile launchers, my brother let me have some of his Imperial Guard ones as compensation for gluing together a squad for him. To bulk them up a bit (and enjoy myself) I did some cutting and reposing for some wolfy action. One of them is reloading or something, the other has just wielded his launcher like a baseball bat to kill some local wildlife. The backpacks on them, I think, are meant for the sergeant to use, but I couldn't have just two guys with ordinary packs when all the other Long Fangs had special ones =)


Vjork took quite a bit of work, and I'm looking forward to painting him up. Firstly I had to find some arms that were roughly in the right poses. I actually stood up myself holding a vacuum cleaner pole to get the pose right, as though he's just returning from a big swing down by swinging back up. The hands had to be cut at both wrists.


The right hand was cut and filed down to make a groove for the missile launcher to slot into, there's a nice flat rectangular bit that worked well. Another one of the big open hands was the right size to grip the bottom of the missile launcher. After that it was just a lot of fiddly repositioning with some greenstuff to help get the arms in the right position. 


Slightly different angle here, I found that it was easiest to get the greenstuff stuck in a fairly big blob, then glue the hands on and wait for the glue to partially set. Then I could reposition things by swivelling and moving just slightly and the glue was set enough to keep it together, but not so set that it wouldn't move around some.


Here you can see a bit more of the hand that had the most work done to it. I cut a thumb off and reglued it back on in a better position (originally it was bent down into the fist). A bit of paint and you'll never know =)


Vjork Verminslayer has a somewhat psychotic hatred of creepy-crawlies. His pack leader recently gave him a big dressing down after he launched a frag missile at a Fenrisian spider nest, narrowly avoiding killing some nearby Blood Wolves. On their current mission a massive rat-like beast skittered across the field of battle right in front of Vjork. With his sergeant's condemnations still ringing in his ears he chose not to waste a missile, but still took care of the rat-beast in an efficient manner.


The rat is a giant rat I got cheap on eBay (well, a whole pile of them) that I planned on using for my LotR army at some stage. I'm not sure if it's visible really in any of the shots (actually, in the one a couple up from this one it is) but I also indented near the top of the missile launcher by filing away a bit then putting some plastic glue on it. Once the plastic glue had sat there for about half a minute I scraped it away, leaving a slightly misshapen, but roughly semi-circular indentation on the barrel for where it has impacted the poor rat-thing. When painted I'll leave that bit metallic, as though the paint was stripped and put a matching colour paint in a similar shape on the head of the rat-thing to show where it was hit.


Anyway, being completely new to 40k I don't know whether this sort of tom-foolery is allowed, but I had a blast doing it and now have my two long fangs squads!


Next on my list are the remaining few Grey Hunters and then after that the scouts (though I'm not rushing to get them done).

Thursday, June 16, 2011

Long Fangs

I put together my first group of Long Fangs this week and I've gotta say, it was a real blast (pun intended).


Those models are FUN to put together! Such whopping big guns! 


The parts all dovetail together nicely and although you're a little limited in poses due to the MASSIVE guns, I really just enjoyed building them!


I added some Space Wolfiness to them in legs, heads and shoulderpads. As these guys are seniors and have long histories behind them, they are bare-headed. 


So here they are...


The plasma cannons are so cool, I love the wires and everything. There are seven small wires that go into one big cable that then emerge as seven small wires again. Hopefully I'll have a go at painting them each a different colour or something (though when that'll be - who can say!) I gave the plasma guys mohawks, they live dangerously as their guns could kill them at any time, so they're a bit rebellious and rambunctious fellows!


The sergeant I glued a big scope to the side of his bolt pistol so that he can better work out where to direct their fire. Some of the heads needed a bit of sprue on the bottom of them to bump them into a better position. The lascannon and missile launcher in particular I tried to make it so the guys were looking down the scopes.


I also love the massive chunky backpacks. What's not to love about these models!?


I still have five more to go, another sergeant, another three missile launchers and another lascannon. And that's all I have time for today, baby is calling =)

Sunday, June 12, 2011

Final Army List and Cyclone Missile Launcher Conversion.

Well, have been on a little holiday, so sorry about the absence of recent posts.
On the plus side I got my next (and last) delivery of miniatures!


Last because GW have decided to try and force us to continue paying exorbitant prices for our miniatures (about 200% of overseas costs) by restricting sales to Australia from overseas.


I'm sure some eBay shenanigans will ensue, but in the meantime I'm all set anyway.


On the negative, my brother needs to save up for a new computer, so his army will be stalled for a while =(


Still, now I have an army list that I will share for your amusement. Why amusement? Because it's to look nice put together and to enjoy painting etc. rather than for any actual combat effectiveness.


I know I haven't done the backstory I keep promising, but suffice it to say that these guys are expert subterranean fighters and hence don't use tanks and heavy vehicles. They will use drop pods to get to the right places on a planet to head underground.


So I've sort of split the army into two divisions.


First Division: Skodi leads...


Wolf Lord in terminator armour with dual claws (Skodi, you've already seen in action).


4 Wolf Guard Terminators as his bodyguard - 
Hammer and Shield, Storm Bolter and Wolf Claw, Storm Bolter and Power Fist, Assault Cannon and Frost Sword.


Pack 1 - 9 Grey Hunters plus a Wolf Guard Pack Leader in Power Armor, combi-melta and powerfist. Pack has a melta, a power weapon, a wolf standard and a mark of the wulfen.


Pack 2 - 6 Grey Hunters, one with plasma gun.


Pack 3 - 4 Long Fangs (2 missile launchers, 2 lascannons) and a pack leader.


Second Division: to be announced leads...


Wolf Guard Battle Leader in terminator armour with dual frost axes.


3 Wolf Guard Terminators as his bodyguard -
Storm Bolter and Thunder Hammer, Storm Bolter and Frost Sword, Storm Bolter and Powerfist with Cyclone missile launcher.


Pack 1 - 9 Grey Hunters plus a Wolf Guard Pack Leader in Power Armor, storm bolter and thunder hammer. Pack has a melta, a power weapon, a wolf standard and a mark of the wulfen.

Pack 2 - 6 Grey Hunters, one with plasma gun.

Pack 3 - 4 Long Fangs (2 missile launchers, 2 plasma cannons) and a pack leader.

Auxiliary Elites:

Loki the Venerable Dreadnought, Heavy Flamer and Multi-melta.

Lone Wolf in terminator armour with chainfist, shield and wolf companion.

"Extra" wolf guard with combi-plasma and thunder hammer (for bringing squads up to number if needed).

Scouts, 5 with a Wolf Guard Pack Leader in power armour, combi-melta and thunder hammer. Scouts have a Melta, Power Weapon, Plasma Pistol and mark of the wulfen.

Roughly 2200 points all up, depending on extras like sagas and meltabombs etc.

The first Division is 905 points, second is 765.

From this I can mix and match squads and elites to field all sorts of different armies.

Have started putting together the next five terminators (how could I refuse!)

I didn't have a cyclone missile launcher, but had a leftover missile launcher from the drop pod, so with a bit of greenstuff I'll save myself some more money...

Here's the Wolf Guard Battle Leader. I wanted him striding purposefully forward with axes slightly wide, kinda like the Dwarf Champion from LotR SBG. I had to do some cutting and pasting of axe bits to get it to work and will need to greenstuff some bits where the arms attach to get the pose right, as you can see by the blu-tac.


Here's a powerfist and storm bolter guy. I want to keep each wolf guard unique, so they've all got a different weapon load-out. This is sort of the traditional terminator look.


Here is the power sword guy, raised as though ready to strike down and the thunder hammer guy in just a sort of interesting pose, at least I thought so. I've also tried to keep all of them fairly open, not covering their chests and looking as though they're really not caring about any laser shots or boltgun shells pinging from their armour as they stride forward or launch their attacks. 


And here's the cyclone missile launcher guy. I'll take a side on shot later, but basically I've got him so that he looks quite dynamic from the front, from the side you can see that his body leans forward, with the missile pod to the rear in such a way that the center of gravity is still above his feet. Like he's leaning forward under the weight of the missiles a bit.


Oh, and the three terminators accompanying the new leader have termie helmets, the other four are bare-headed. Just another way to distinguish them a little. I figured the missile launcher guy needed the face protection for the exhaust! Also that these terminators are slightly less senior ranked than the ones accompanying the Wolf Lord. Or something.


A wedge of greenstuff under the missile pod, when painted, will hopefully not look too out of place.


Back view. I plan on adding purity seals or wolf tails or something to cover up any joining mishaps.


Anyway, there you go, a bit of kit bashing to make a cyclone missile launcher from bits I had lying around!


As always, progress will depend on the sleeping habits of a four and a half month old (which is mainly very little sleep still).

Friday, April 8, 2011

Dreadnought Banner

I haven't been super painting, but have done a bit in the last few days. Been mainly working on the banner, as it was the last piece with no paint on it.


Here it is with a single coat on everything. My plan is to make it the same as the shoulderpad, but with a white wolf on it (as his namesake, Loki, was a white dog - I think he'd get a kick out of being remembered as a white wolf as he was nothing like a wolf, more like a teddy bear).


So Astronomican Grey for the bits that will be bone, as it gives a good undercoat to add light colours to. The very top skull bit will be bronze, like the ones on the torso, so it has a metal undercoat. The lava bit is undercoated in Iyunden. The banner is Space Wolves Grey.


Next I've started doing some yellows on the bottom part, my yellows are either very old or just not very pigmenty or something, because I can never get a smooth yellow. The wolf and banner were done in Astronomican Grey with white for the wolf and bleached bone for the banner. The wolf head was done freehand using this excellent tutorial: http://www.bolterandchainsword.com/index.php?showtopic=184639&hl=space+wolves


The Bleached Bone bits are given a sepia wash, quite heavily on the skull. The fur is given a bit of extra drybrushing to make it stand out a little better. The lava is just yellows, oranges and reds sort of swirled around, then Scorched Brown blobs on top, bigger at the bottom, smaller at the top. Some Desert Yellow and Graveyard Earth are used to give some definition to the banner. The Space Wolves Grey on the top is given an Asurman Blue wash.


The lava is given some red washing to dull down the yellow. The skull is highlighted with more Bleached Bone. The wolf is given another coat of white.


And here it is pretty well completed. I'm still not 100% sure what to do with the white wolf in the middle. It's SO white. But it's meant to be I guess. I might see what it looks like when all assembled. 

Anyway, the lava has some black on top of the brown to further darken those bits. 

The side bits have white stripes with Ice Blue runes. A mix of Ice Blue and White on the tips of them, Ice Blue and Hawk Turquoise towards the middle of them. 

The Space Wolves Grey on the banner was washed with Asurman blue. 

An eye was make in Ice Blue with a white pupil. 

The skull has a slight highlight of Bleached Bone mixed with White. 

The back of the pelt is Dark Flesh, Scab Red and Red Gore. 

The top skull has some highlight layers of Dwarf Bronze mixed with Chainmail. The gems are Scab Red, Blood Red and just a dot of Blazing Orange on the front. 

The text was very, very carefully done with watered down Scorched Brown and a bit of Black added to the bottom of it. 

I think it looks pretty good, better from a distance than up close like this! Still not sure about the white, but don't really know what to do about it!


From the chemist I got two 1mL syringes and made up some paint pots of Shadow Grey and Space Wolves Grey in 4:1, 3:1, 2:1 and 1:1 ratios. The syringes cost about 40cents each =) I figured I'll go through enough and paint sporadically so this should be easier than mixing small amounts every time I paint.

Here's the back, with the right leg highlighted and the left leg not. Not sure you can really see the difference in the photo, but it is noticeable. 


And here's the front. Again, one leg highlighted, the other not. I'm really not sold on it, but my wife thinks it looks great. You can see the bands of colour if you look closely, but at the same time from any distance you can barely tell there's any colour change as it looks like you'd expect the curve to look. 


I guess it looks better than the unhighlighted leg! I have to keep reminding myself that you only see them from a distance anyway! I've seen people do this then put a final glaze over the top to try and work them all together, I've never had success at that. I just either put on too strong a colour, or can't get it on evenly enough. 


My other massive purchase for the week was this sand from a pet store. It's for putting in their Hermit Crab tank and is black. $3.65 for a 1.5kg tub. That'll last me a LONG time and is more convenient than the previous massive bag I used to have and way cheaper than some of the other options around.


So that's where we're up to with Loki, my mighty Space Wolf Dreadnought. With any luck I'll be able to get bits highlighted one at a time and then it's pretty much done bar the gluing!

Wednesday, April 6, 2011

Loki the Dreadnought

Slower progress than usual this week, our poor little doggy Loki had to go to doggie heaven =(


A mixture of age and long term illness, but we're all very sad to see him go.


So as a result, since Loki is a good Norse type name, I've decided to name the dreadnought in his honour. I've covered everything with a layer of paint now, so it's looking good now. The photos are a bit washed out, but hopefully you get the idea. You can see I've done a little name scroll with "LOKI" on it, and will do similar on the back banner, which has had no work done on the front of it yet.


You may notice a few missing tiny chips on the left arm, paint just doesn't seem to want to stick to it for some reason. I'm hoping that the fixing spray after I've done will help that. I've done some green lenses on various lensy type bits. I'm not very good at them, but I think they look okay and add a bit of colour.


And here's the right side, with wolf skull over the human skull. The shots are really too washed out to get the detail, will take better photos once he's done. 


The flamer was the heavy flamer from the terminator kit, cut down a bit to fit next to the claw.


I've also mucked around a tiny bit with some of the minis...


My wolf-lord to be (Skodi - named after our other dog, who is very much still with us)...


When I make a base for him I plan on having some lava underneath to glow on the cloak, we'll see how that goes.


My assault cannon termie, Osgar, with frost sword converted to angle down, sort of like he's using it to counter-balance the cannon. 


I really love the big belt feed and feel of the massive cannon!


And one of my wolfen guys, because they launch themselves viciously into close combat, I figured I'd model him with his two guns, which he throws to one side before pouncing on his prey. 


So that's where things are at the moment. I've just bought more shadow grey and space wolves grey, so should be able to start doing the highlighting on the dreadnought soon. Then it's just fixing up the front of the banner, sticking an axe or something strapped to his back to cover some more skulls and he'll be ready to fight!


My brother has been churning out units, but since a venerable dread is worth so many points we'll probably not be too far apart points-wise!


You can check out his progress here: http://pauls40k.blogspot.com/


Can't wait to play on his 3-D Hirst Arts block space hulk board!

Thursday, March 17, 2011

Space Wolf Drop Pod Part 4

Am getting much closer to completion now, I think if you had a dedicated day you could probably do it in a day, certainly if you were just doing a single layer of paint you could.


Here's my blu-tac version of the top central section. Well worth doing a quick blu-tac mock up to see how it all works I think! For starters, there were central sprue bits in some of the sections that needed removing. You don't have to be super neat, just need enough clipped off to allow the central shaft to fit through.


The top few pieces all glue together, and the bottom two glue together separately. What this does is leave the bottom two pieces free to rotate, then you can glue the bottom of the central shaft to the bottom two bits to keep it all together.


You don't have to leave it to rotate, but it'll be cooler to mount the gun so that you can swivel it to face what it shoots at.


I started doing the harness bits too, one word of caution. When you test attach things, be careful when you take it back apart. They are very thin and fragile, I had two of these breakages while doing this. Fortunately they're right in a spot where they're unlikely to be seen anyway, so I just glued it back together. Still, though, be gentle here!


And here you can see I'm testing out how all the bits join together, trying to work out in which order to glue them all together for minimum fuss. I think I'll glue the harness sections to the central bit, then glue it in, then attach one of the big side bits, then attach the top center bit to it, then work around the top, gluing in each big side bit one at a time. Hopefully I'll be able to get them all in place before the glue really sets so that I can wiggle it around into place. I'm not really thinking that I'm going to be too successful, it looks very fidgety! 


Here are the outsides of the finished doors. I've done all the little panelly bits in metallics. And I've just realised looking at the picture that I haven't done the badab black in the central indentation bits to darken them up! Oh, and I'll probably do a bit of Chainmail edging of the metallics too.


Here's the center spindle bit WIP, two light coats of Fenris on it at the moment, but it's all glued together now (and yes, the bottom, well, top in this picture, swivels just fine!)


All the harness bits are glued. However, I didn't hold them together for long enough and when I checked them this morning, the cylindrical bits have separated a bit, also I didn't clean them up enough. All of this means that I'm going to have a rotten time trying to get that part of the assembly together =( Still, this won't be the only drop pod I do, so I've at least learnt something for next time!


Here's what I'd done with the central part of the harnesses before gluing it together. Just a Fenris coat, then some Boltgun on the metal bits, a wash over the metal bits and recesses and a further couple of highlights on selected parts which you'll never see when it's all together anyway! =)


Lastly for today, WIP of the bits that stick onto the central top spindle. 


If I can get a few more hours in over the weekend I may even finish it up by next week some time =)

Thursday, March 10, 2011

Space Wolf Drop Pod Part 2

Well, sorry for the long time between posts, but this baby doesn't seem to understand my hobby yet =)


My wife has been taking him for daily walks, so I squeeze a little time in here and there (most often for napping rather than painting!)


So here's some of what I've been doing...


Firstly I finished off one drop pod door, then got the rest of them out and have been working on them.


I can't remember what I was up to last time, I think just black spray? Anyway, I clipped these out but forgot to trim the little bits off from where they were attached to the sprues. Rookie mistake, I know! Anyway, you can probably see the nubbly bits poking out in places.


The blue part is Fenris Grey foundation, fairly well watered. I used a 1cm wide flat brush and applied it in a diagonal fashion one way, let it dry a little, then went back in the opposite diagonal. It seems to cover very well. Then I tried to highlight it with a shadow grey/space wolf grey mix. One more heavily on the shadow grey side, one towards the space wolf grey side of things. I'm not planning on going as light as pure space wolf grey, I think it's too bright for my liking (although it would make things a bazillion times easier - I hate mixing paints!)


The other side of the doors are boltgun metal for the metal part, two layers of Iyunden Darksun foundation, a layer of Golden Yellow, then two layers of Bad Moon Yellow, yes, it seriously takes that many layers for my yellow paints to cover it well. I don't know if it's because they're old, or just that I'm impatient. I have a really hard time making yellow cover things without showing brushlines or being too thin to work well.


The black lines are just Chaos Black. Then it's a Badab black wash over the metal bits.


As you can see, I've decided to paint bits first, then assemble. With interior stuff I reckon it's gotta be easier this way.


So here are the doors almost finished. Some neatening up to do yet, but pretty much there.


Here's the platform that sits inside the pod. So far all I've done is a drybrush boltgun metal over the mesh, then a Fenris undercoat.


I've also assembled the undercarriage, had to glue on the little turbine things. Glue's still a tad wet, so no paint on it yet.


And you can see in the above shots that I've clipped out the harnessy bits. I'm just putting them together with blu-tac to see how it all works before I decide the order in which I'll apply paint. I think I'll actually paint the harnesses separately, then assemble the middle column, then paint it, then attach them all together.


I'll try to take WIP shots of that when I get up to it. There's one small trick in that one harness is supposed to be like a commander's one, and has an extra little loop of pipe and attaches next to a little monitor and keyboard on the central column. As I said, I'll WIP it when I get to it!


I've clipped them all out and trimmed the nubs off them, but will have to do a little more trimming to get them to fit snugly together it seems. Still, I'm impressed by the jigsaw nature of the bits that clip into other bits, very clever - though fidgety!


So that's the work in progress so far of my Space Wolves Drop Pod. Birthday is next week, so at some stage I'll actually have some Space Wolves to put together =) Looking forward to putting them all together, though I think it will be a long term project!