
Anyway, back into it with another Lord of the Rings Strategy Battle Game Battle Report between my faithful dwarves and my brothers evil Haradrim.
We chose 700 points again, put together our forces, then met at his house to do battle. We rolled on the random scenario generator and got Contest of Champions! Basically the winner of the game is not the one that destroys the enemy forces, rather it is all about your leader. Being in charge of a warband requires the loyalty (dwarves) and maybe a touch of fear (Haradrim) among your troops, what better way to show who's in charge than personally dominating the battlefield! At the end of the game, whichever leader has the most number of kills wins.
My leader is Etako Ironfist, also known as One-eye, 95 points, his main advantages are his high defense and Ironfist weapon (+1 to wound and rerolls as though under the effect of a banner).
My brother's leader is Suladan the Serpent Lord, 100 points, his main advantages are an extra wound and, his trusty steed!
We don't have the new rules yet, but have been roughly making our armies based on warbands of one leader and 12 troops. My birthday in a couple weeks, so am hoping to get the new dwarf army book then.
Anyway, onto the fight itself:
Here's the Harad warband 1, not sure his chieftain has a name yet, but he's leading twelve archers.

Here's The Betrayer leading six Watchers of Karna as the second warband.

Here's a Hasharin (I think he has a name, but can't remember it right now) leading a banner bearer and fourteen spearmen (I know that's not right for the new rules, but I guess you could put them in the Betrayer's band and just move them together from Turn 1.

And lastly, the fourth warband, six raiders led by Suladan, three with bow, two with warspear, one with banner.

Here's the battlefield ready to go, it's about 5 foot by 3.5 feet, so not usual size, but that's the table we have! True line of sight rules used, but the sections between individual trees, ruins and rocks count as difficult terrain.

Here's Etako's warband of a Banner Bearer, five Khazad Guard and five Iron Guard.

Here's Brynmor leading a banner bearer and five Vault Warden teams.

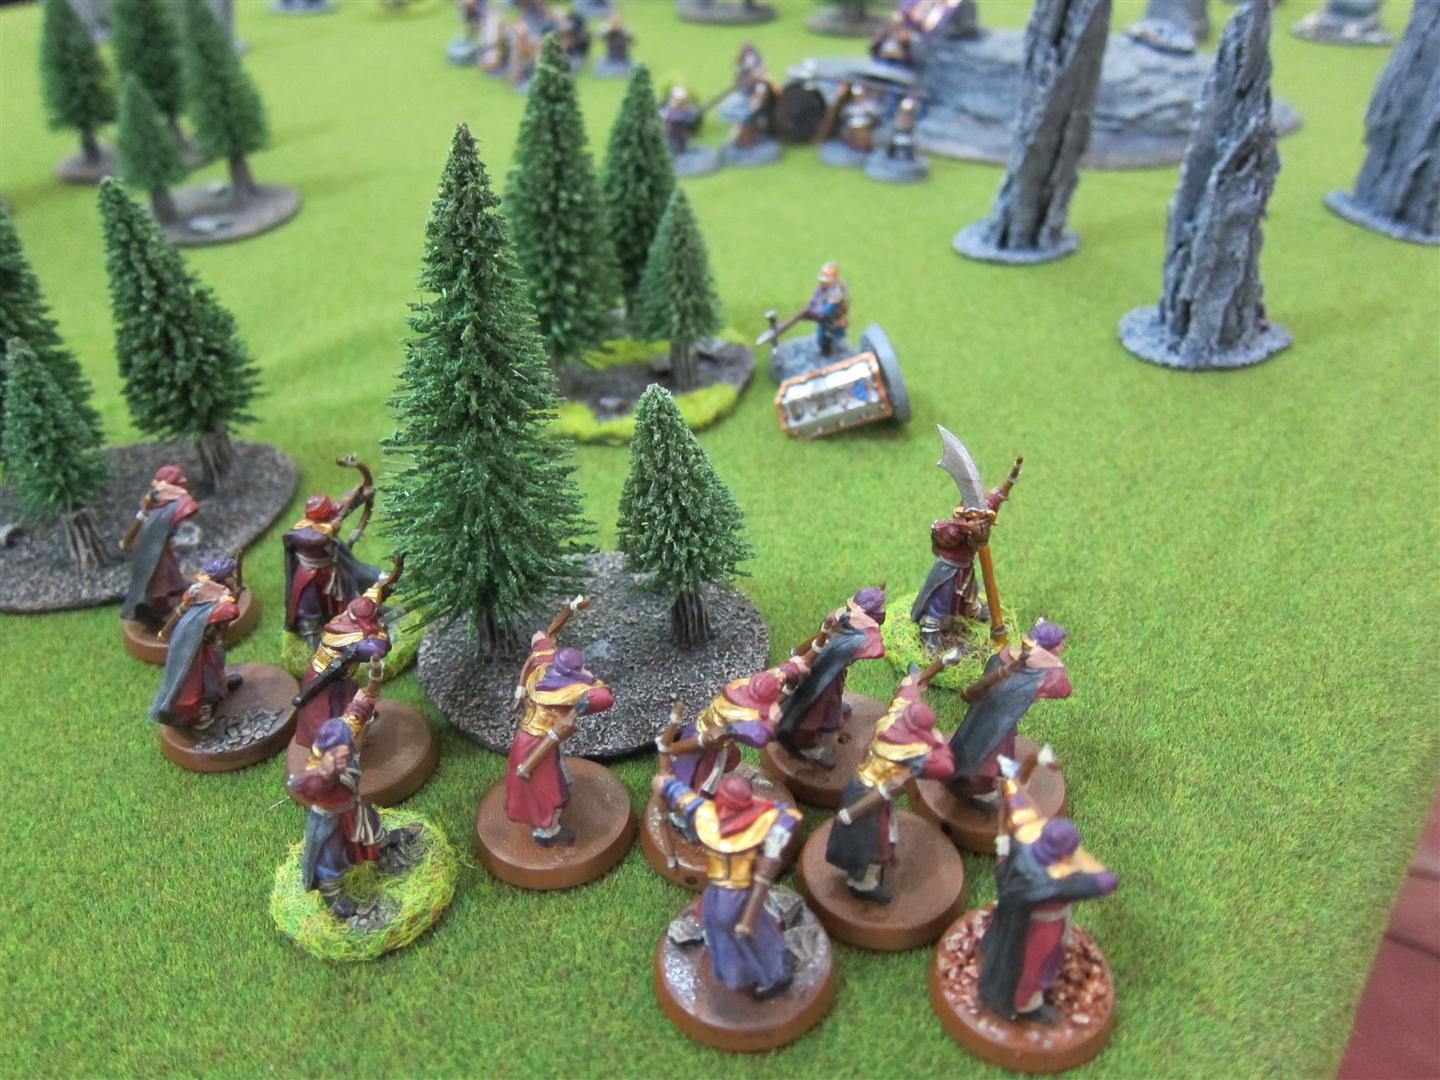
Lastly, here's Boggle, my dwarf captain with throwing axes and shield leading twelve archers.

After a couple of turns you can see the lines surging forward. I was hoping for an objective based mission so my vault wardens could park somewhere and raise shields, but oh well, they'll just have to go bash stuff instead!

Suladan leads his raiders on a lightning fast strike towards the dwarven archer flank.

The archers climb the small hill to get a better view of the battlefield.

The Haradrim archers stay well back and fire volley after volley at the dwarven host. By the end of the game, they've accounted for five or six troops, and early on managed to stop me from volleying by killing three of my archers.
On some missions it's not worth it, as those troops could be used for swarming over my outnumbered dwarves, but on this mission, keeping these lightly armoured guys away from my hero was probably a good move!

Suladan charges into battle, the banner bearer falling to combined archery from the dwarves on the hill. His horse rides roughshod over the top of a Khazad Guard, hooves and sword flashing down to batter past the defenses of the stocky dwarf and slay him. The dwarf captain manages to raise his shield and beat back the attacks of the raider. (If it hadn't been for the extra defense from the shield he'd have been dead!)

Check out that long line of Haradrim infantry! The haradrim archers kill roughly a dwarf per turn. The dwarven archers focus on killing the raiders, and eventually de-horse most of them.

Turn 5: Both Boggle and Suladan call a heroic move! On the roll-off the dwarf captain wins (phew) and stands up, attacking the raider, while his companions also move in. The Iron Guard hurls a throwing axe that flashes past Suladan's horse and thunks into the chestplate of his armour! Fortunately for him, fate is on his side and he suffers nothing worse than a split gem (though it was worth a small fortune!) In retaliation, Suladan leans forward with a mighty cleave of his sword to slice through the Iron Guard. Boggle wins his fight against the raider, but some fast hoofwork backs the human away from the flashing axe of the dwarf.

On Turn 6 the dwarves win priority again (they win priority for the first 7 turns in a row!) but Suladan calls another heroic move, ensuring that he gets the charge (vital for horses to really capitalise). In an epic battle of Suladan vs. Boggle, they both roll well, and it goes to a tie-breaker roll-off which Suladan wins and wounds the dwarven captain. One of the dwarven raiders manages to swing past and attack and kill the dwarven banner bearer! The other nearby Haradrim men are not so fortunate, they fall to the flashing axes of the dwarves.

The Hasharin swings past the dwarven battle-line to assault a spearman and kill it amidst flashing daggers. All of the other dwarves hold fast, although they lose their combats their superior defense ensures that the only death comes from an unlooked for source - The Betrayer! Evil magic in the form of black darts take out several dwarves over the course of the battle.

The battlefield is essentially one big melee in the middle with archers peppering volleys in on exposed dwarf flesh.

The dwarven captain calls his own heroic move and Suladan is surrounded! A throwing axe kills a nearby spearman to clear the way for dwarven archers to barrel down the hill into close combat. Suladan bucks and rears his horse, but the dwarves hit him with several nasty blows and reduce him to a single wound!

Meanwhile, Brynmor is attacked by four spearmen and the Hasharin! One of the nearby Iron Guard sees this and hurls himself towards the dark assassin. Against all the odds, the dwarf manages to get some of his blows past the fearsome man, fate goes against him and he is left with no fate and just one wound at the end of the struggle.
With his back saved, Brynmor swings his mighty shovel, the sharpened mithril edge of which cleaves two evil men in twain! Most of the fights are four men vs a dwarf, or two men vs. a dwarf. The dwarves lose one Khazad Guard, but otherwise hold their own, indeed, a Watcher is slain.
Etako races down the hillside and barrels right into a spearman, the Ironfist slams into the man, throwing him senseless through the air to crash to the ground, out of the fight for good.

The melee is intense and bloody, and it seems as though a never-ending stream of black and dark clothed men is hurling itself against the stout dwarven lines. The mighty shields of the Vault Wardens protect them from a multitude of spears, swords and daggers.

Suladan loses the fight and dies... or does he... remembering the nearby banner (which my brother cunningly moved forward) we reroll the fight, Suladan gets a tie! The tie breaker goes to the Serpent King, who kills Boggle and an archer - increasing his tally still further and proving that he is a force to be reckoned with, though young in years compared to the dwarves!

The Betrayer calls upon evil magic and attempts to transfix Etako, who uses all of his will and (by rolling a six) resists the spell!

Etako uses his freed up limbs to take on two Watchers and spearmen. He deflects incoming attacks with his fist, the flashes his axe out to take the life of a Watcher. The Hasharin retaliates against the lucky Iron Guard and quickly finishes him off in a whirlwind of blades. Brynmor again hurls his mighty shovel through the brainpans of another two men. Along the line the dwarves, having survived the inital assault, attack back with renewed vigour, slaying a host of evil men.


Etako is again assaulted by a mass of men and is transfixed, unable to move or fight back effectively. He is beaten, but manages somehow to deflect the blows rained down on him. Fate is on his side and he only takes one wound, though now he is out of fate and will.


Etako makes another kill as his Vault Wardens help take the pressure off!

After the vicious melee of the last few turns, the Haradrim forces are now broken, but all pass their leadership tests this turn, still, the game is in it's last legs now and Suladan has killed more dwarves than Etako has killed men!
And Suladan spurs his horse around the action to pick off a lone archer - there's just no stopping that man and his horse, the movement rate is just sooooo fast compared to the dwarves - he's a killing machine!
The Haradrim banner bearer manages to beat back two Iron Guard and a Khazad Guard!

Finally, the Betrayer, sensing his time at this location was nearing completion, charged at Etako. His black miasma cloaked his attacks and those of the Watcher that darted in to stab with sharpened steel. Etako fought valiantly back, but fate was not with him and he suffered a wound. After stabbing the dwarf, the Nazgul faded away, evil laughter reverberating across the battlefield.

In the final few turns of the game, a Vault Warden team that had been distracting the archers suffered a lucky shot that skewered the shielded dwarf through the tiny eye-slit in the massive barricade. (So many sixes rolled!)
And here's a closer shot of Suladan's continuing rampage.

On the final turn Suladan charges into battle again, slaying two more dwarves! The banner bearer falls under the onslaught of no fewer than five dwarves!

The Haradrim chieftain kills a speardwarf, finally getting his blade bloody after loosing arrow after arrow throughout the battle as he guarded the massed archers.

Suladan's final tally: an impressive seven kills, including one Captain! He easily killed more than his own points worth.

The final game shot, with the Haradrim's longer legs, Etako would never be able to catch up with any! As in the last game, the dwarves won in terms of the battle, but lost in terms of the actual mission objective as Etako only managed to take down three men (four if you include the Nazgul expending itself to fight him).

So congratulations (again!) to my brother on a victory!
I loved playing this game. I may have lost but boy it was a blast. So much fun! There were heroic combats, epic struggles, flukey random awesome shots... Once we got into combat every single turn had at least one "whoah - cool!" moment in it.
In hindsight, I should have marched Etako over towards the horses to get him killing more quickly. As it was I sort of had the archers in mind without thinking about how long it would take to get there! Those stubby little legs!
Anyway, totally awesomely fun game and hope you enjoy the pics =)
Hey guy, really cool battle report! I see you're using small cards to keep track of your Heroes' various stats, did you make those yourself?
ReplyDeleteHi! I made them on my computer and printed them out. They have the name of the unit and a photo of our painted figure for easy identification, then a very brief summary of their abilities. Then M W F if they have any. Along the bottom is their stat line.
DeleteGreat writeup. looks like y'all had a blast.
ReplyDeleteSad news for Harad: under the new Fallen Realms sourcebook, warrior base price is boosted by 1pt, and raiders no longer have bow & war spear in base cost - they each cost 1pt extra. The good news is the watchers of karna are now D4, so hopefully they will survive a bit longer.
Another great battle report. Keep it up and I'll be looking forward to future reads with the new scenarios in mind.
ReplyDeleteOh and Happy Birthday (a few weeks early)
Hey, that was pretty epic. I just wanted to say thank you for your blog. I and all the other followers of your blog really appreciate it. If your interested, I just started a blog, mostly being inspired by yours and your brothers work. Anyway, I just wanted to say thanks.
ReplyDeleteIf your interested, paladingaming.blogspot.com
Great report (as normal), I look forward to the next one - the Dwarves will get revenge!
ReplyDeleteGreat write up! Was lots of fun playing :) And I love the shot of Brynmor standing over the defeated Hasharin. Some great photos in there!
ReplyDeleteNice game! It's great to have you back. I've been missing your lotr write-ups.
ReplyDeleteDo you guys spend a lot of time taking all the pictures, or is it pretty fast just in between/during turns?
Thanks for all the kind words, really glad people enjoy reading them.
ReplyDeleteIt used to take ages to do the photography but when our son was born I bought a new camera.
It's great, all of these photos are taken with the camera just in default auto mode so it's just point and click now. Has sped things up a lot.
Basically we just take a few shots at the end of each turn. One shot of each action area or of some cool terrain/model line-up and one of the board as a whole. The board shots help me remember what was going on for the write up.
I used to annotate each combat, but now I just jot down notes of major things.
I hope you'll agree that the battles look better every week as my brother paints more and more of his models!
Great read! I always enjoy your battle reports!
ReplyDelete