
LotR SBG is sometimes about skill, tactics, strategy, a bit of luck and lots of dice. Other times it's all about the models, scenery and fun story that plays out in front of your eyes! I know different people like different elements of the game. My brother and I tend to the latter, we're in it for a fun bit of entertainment. And if that entertainment is a newly painted Great Eagle chomping on banner bearers, well, who can deny us that =)
My camera was running very low on batteries, so I didn't take as many shots, but still got plenty that turned out well enough to put up here, so enough blather, on with the show...
Here's my army, same heroes as previously played, but smaller warbands to accomodate the Great Eagle, Barukshathur (Axes of the Clouds in Dwarven if you've not been keeping up). On the right of screen are Etako's four Khazad Guard, four Iron Guard and Banner Bearer. (Etako is basically Balin for those of you who are new, but with an Ironfist and one eye.)
In the center are Boggle's band of eight archers (Boggle is a dwarven captain with shield).
On the left are Brynmor's warband, three vault warden teams, a banner bearer and two Khazad Guard.
To the rear for dramaticness is Barukshathur the Great Eagle (using Gwaihir's stats).
.JPG)
My brother has his usual troops, though with an additional spearman to balance my slight overspend (704 points).
.JPG)
And the board...
Domination is about key locations on the battleground. The four locations here are the small tower back right, the well, back left, the tomb, front left and the weapons cache and treasure (blocked from sight here by the ruins in the front right). After a team breaks the game can end and whoever has the most locations secured (more models) wins.
.JPG)
In Turn 2 we pretty much all ran forward. My archers climbed the tower and posed near Barukshathur for dramatic effect... (gratuitous eagle photo)
Here's the board after a few turns...

The Haradrim raiders, led by Suladan himself, race forward to the well. The Hasharin appears back-lit against the lava if you look carefully...

The mission continues, one dwarf archer falls to the volley firing of the Haradrim archers. They hit soooo many times this game, but only got about three kills. Meanwhile they completely secured their objective. None of my guys wanted to charge at 13 poisoned bows.

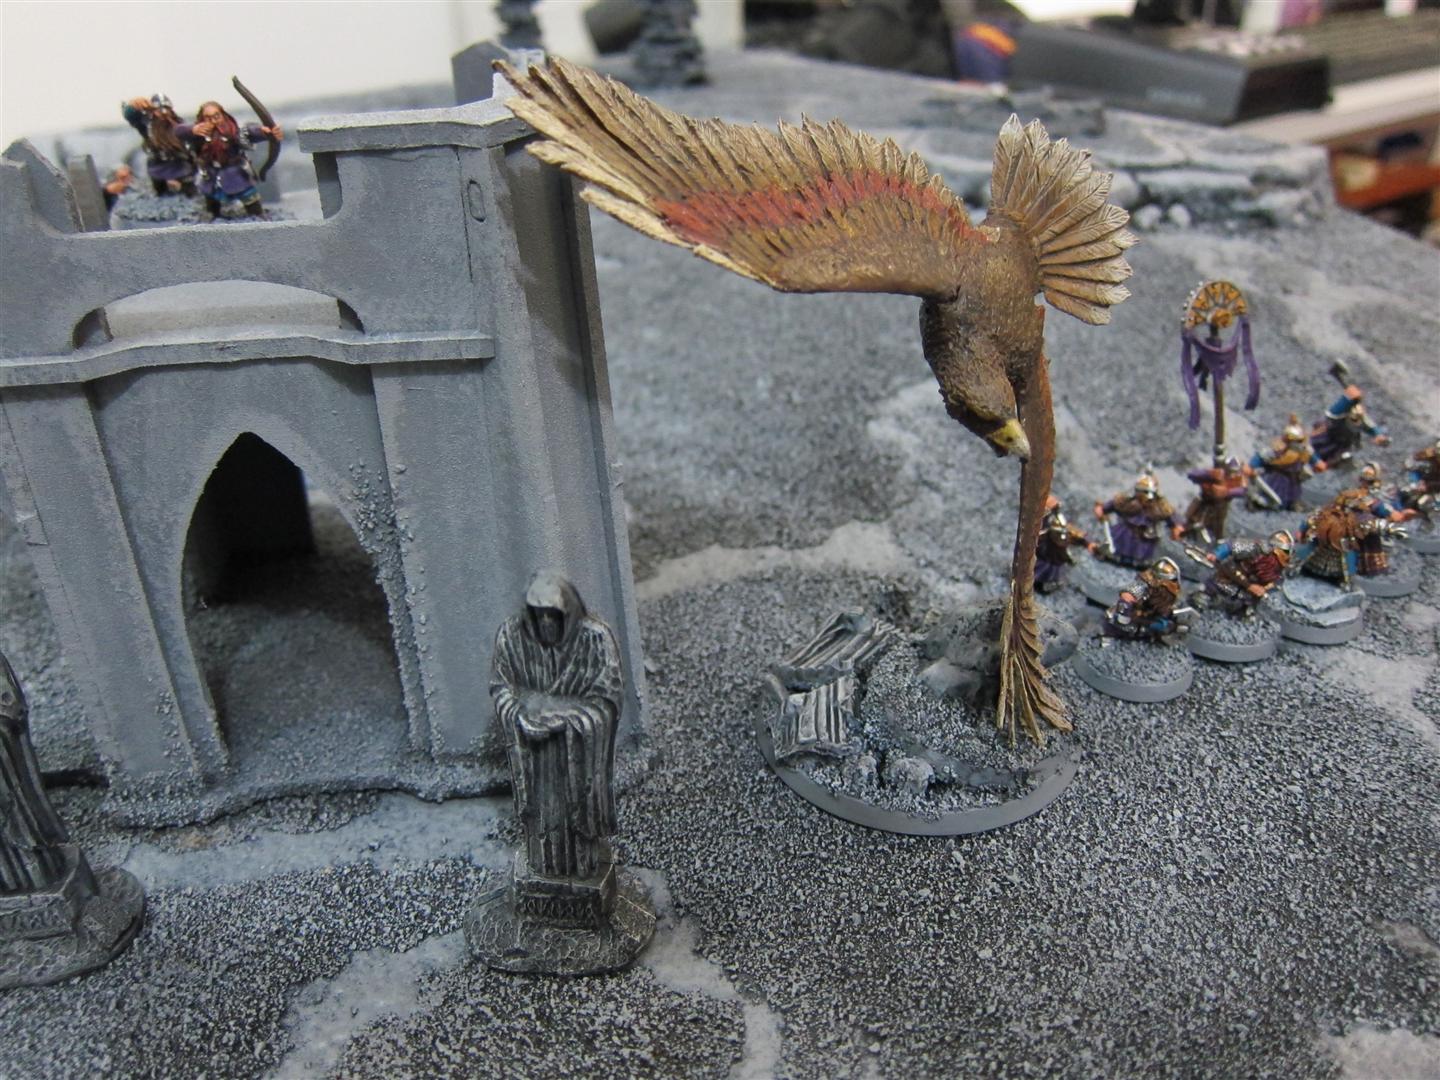
The first melee of the match was a surprise fly-over by the Great Eagle, who swooped over the intervening terrain (wow, flying is really fun) to attack the banner bearer at the rear of the spear group led by the Hasharin. The banner was immediately picked back up, but it was still cool =)
The poor Hasharin, at the front of the spearmen, was shot at by the dwarven archers. They hit him and would have wounded him if not for his massive supply of fate. He used it all up, but no blood was spilt and he raced on, cursing his lack of cover.

The Betrayer poses menacingly on the hill... (less menacing with the window and curtains behind him, but pretend it's not there!

Here we are at the end of Turn 4...

Turn 5, The Betrayer Black Darts the Banner Bearer, the banner is picked up by a nearby Khazad Guard, who curses the loss of his massive axe, but knows the value of the ancient banner. Believe it or not, it was only in this game that we realised the wounding table is not symmetric. We've been playing that strength 9 hits (like the Black Dart) wound on a 1 for lower armoured troops. Little did we realise that the wounding chart never goes below a 3! Duh! How did we miss that?!?!?! Makes me wonder what else we're doing wrong! Oh well =)

Barukshathur uses his only point of might to Heroic Move and charge into some raiders, saving the dwarven footsoldiers from being overwhelmed. Fortunately he rolls a six and with such high fight value is ensured a victory, slaying the raider banner bearer and his companion with a flashing, razor sharp beak and strong, pincer like claws. I'm really loving the super-speedy eagle, disappointingly low might, will and fate for so many points, but still awesomely cool!

The Iron Guard near the treasure cache spread out as a rear-guard for Etako and hurl their throwing axes at the approaching men, killing two!

While the eagle had a munch on two raiders, Suladan and Brynmor each called a heroic move of their own. Suladan won the roll off and he and his raiders charged bravely (?) into the Vault Wardens. Suladan targetted the flank Khazad Guard and rode him down, slaying the dwarf in seconds. The super tough shielded dwarves are unmoved by the charging horses and the long spears thrust forward, killing two raiders.

Here's the board in Turn 6, which was also full of action...

The Betrayer uses a might to call a heroic move... hisses sibilantly evil words and compels Etako, he uses four will and gets a six... Etako uses his three will, but can only manage a four and so is compelled out of line towards a waiting group of Watchers of Karna. The other watchers and The Betrayer himself attack the other dwarves in such a way as to leave Etako surrounded by four evil men!
Barely able to lift a finger, Etako is overwhelmed by blades. Fortunately his awesomely crafted dwarven mithril mail deflects all but one blade and he survives the dastardly attack with only one wound! The other watchers and the Betrayer all survive their assaults on the Khazad Guard, who fight well but cannot land blows past the whirling dervish swords.

Suladan's Heroic Move allows him to charge around and kill another Khazad Guard, while Brynmor thwacks a raider with a quick, but forceful, shovel to the head. In the background, the Great Eagle swoops down, plucks the third raider from the last combat up in his mighty claws, carries him far above the battlefield, then drops him into a nearby lava pool to die quickly, but screaming horribly. Serves him right for being an evil pawn in Sauron's dark game.

In Turn 7 Etako calls a Heroic Move to quickly force combat against The Betrayer and try to gain some momentum back on the assault of the weapons and treasure cache. One dwarf dies to the flashing blades of a Watcher of Karna, The Betrayer is unwounded, but loses another point of will for having fought.

Fist of Iron in a massive uppercut, axe sweeping in a blur shortly thereafter, two dead Watchers of Karna fall to Etako One-eye (after using all his remaining might!). Another falls to an intercepting Iron Guard, dual axes beating dual blades.

At the end of the turn you can see the Haradrim spearmen all entering the tower underneath the archer dwarves - they outnumber the dwarves, so technically dominate the objective! To the top of the shot you can see Suladan fighting with Brynmor, no wounds from that evenly matched fight. The dwarven archers shoot at the Hasharin again, and wound him! The Haradrim archers volley fire (again) and kill an Iron Guard in the center of map thanks to a lucky poisoned arrow re-roll!

Turn 8: A Watcher of Karna takes on the dwarven banner bearer and another Khazad Guard and wins the fight! Two blades flicker out from dark sleeves and both dwarves fall dead!

The Betrayer uses his penultimate will points to try and compel Etako, but the spell fails. The iron-willed dwarf uses his Ironfist Gauntlet to battle the evil ringwraith. After winning a tie of 6s, the dwarf fails to wound the black Nazgul, but evil laughter hisses around the battlefield as the wraith disappears, fading before their eyes. His evil plans have been fulfilled, though the battle is not yet won... who knows what he was really after?

The dwarven archers at the top of the ruins fire down on the encroaching men and kill one, who falls screaming to the ground, an arrow through his eye! The other archers take aim and kill the Haradrim banner bearer, who was to lend aid to the Hasharin - who has leapt to attack Barukshathur!

The Hasharin needs no help from a banner, he takes on the Great Eagle and a Vault Warden team and wins! Flashing blades land on nothing but thin air as Barukshathur flies around. Fortunately for the evil man, he gets a reroll if he fails to wound! Leaping to the air, the Hasharin's blades flash again and he carves a gash in the Great Eagle as well as plucking a large tail feather as a trophy!
In the background, Suladan wins his fight, but directs his attacks against the massive Vault Warden shield and fails to penetrate it.

At the treasure pile, the dwarves begin mopping up, killing the second last Watcher and moving in towards the last remaining man.

In the second round of combat with the Hasharin, an enraged Barukshathur swoops down and disembowels the evil assassin while a Vault Warden team keeps him busy. Boggle slams a spearman with his shield, allowing another Vault Warden team to stab in with a spear to his guts.

In one of our favorite moments of the game, an Iron Guard dwarf charges at the tower, his throwing axe whips forward and kills the guard in the doorway! He leaps in, axes flashing, only to be killed by the spearmen still inside!

Suladan charges Brynmo and a Vault Warden team, they are evenly matched, but Suladan wins the tie-breaker, knocking the dwarves to the ground and this time directing his attacks against Brynmor. He scores two wounds, but fate is with the dwarf and no blood spills, though his barrel of beer is split - he's going to be angry now!

Here's the final turn. As you can see, the dwarves pretty much hold three of the objectives, though fighting at the tower could go either way and Suladan is still doing a good job at his objective, while a Watcher of Karna refuses to die to Etako. The Haradrim archers have hit 14 times in three turns, but have only managed to kill one Iron Guard! Arrows are lying all over the place and sticking out of armoured plates, but very few have blood on them!

The Great Eagle swoops in towards the tower and plucks out a spearman guarding an entrance, slashing his jugular with a mighty beak. The haradrim spearmen have managed to gain a foothold at the top of the tower after killing one of the dwarven bowmen.

On the far side of the tower another Iron Guard manages to slay the defender and enter the tower.

Brynmor wins the fight, but can only stand up after having been charged, the Vault Warden team manages to slip past Suladan's defensive guard and wound the King.

At that stage, with the Haradrim army broken, my brother capitulates and the dwarves achieve a minor victory - but victory none the less!
Here are the victors!

And the survivors of the Haradrim force, who will surely live to fight another day...
The 13 archers kept volley firing throughout the whole game, but only managed to kill three dwarves. I didn't relish the idea of charging towards them, as their fire gets way more accurate when in direct fire range! I toyed with sending the eagle over, but I don't think he'd win against that many guys!

Well, that's yet ANOTHER brilliantly fun game we had. There were so many heroic moves called, evil spells cast, amusing wins against the odds and I got to use my new toy to great effect =)
So much fun, thanks heaps again to my brother! By the way, if you haven't already checked out his blog it's here: http://paulslotrminis.blogspot.com.au/
He doesn't usually take photos with his camera, but posts some if he does as well as his other hobby stuff. Check it out!
Thanks for watching and reading, hope you enjoyed it even a fraction as much as we did!
Stay tuned for our next match, hopefully it will be road testing the new rules properly, though we may have to wait for some more Haradrim reinforcements.
Another great report! Glad to see the Dwarves win.
ReplyDeleteI always wondered why your Black Dart seems to do really well in your games but in mine its pretty useless haha .
Loving the great Eagle! I love all the monsters of Middle Earth but I feel like the goods monsters are let down by poor stats :(
Ill be staying tuned for your next match
Dwarves tend to get dominated in this kind of scenario, so was quite a surprise reading the outcome. I think the Haradrim archers would have been better used in combat, perhaps leaving 3 or 4 behind to guard the objective, the remaining 9-10 could have hampered the Eagle or whatever else. The Betrayer would have been better used targetting the Eagle. You certainly used the Eagle to it's full potential, taking out the Hasharin almost netted it's points cost back! Looking forward to your next write up
ReplyDeleteanother awesome report, great use of the Eagle, will definitely have to pick one up now - I can't wait for the next report. Our Dwarves both seem to have bad luck against Haradrim.
ReplyDeleteOh well - next time your Dwarves will get revenge!
Another fantastic report. Thanks Sim
ReplyDeleteOne of your amazing battle reports...
ReplyDeleteBy the way Betrayer looked more awesome with light from the window falling upon him ;)
Loved the Eagle!
ReplyDelete